LED Kit Building Guide for Modern Pinball Machines
Converting a pinball machine from incandescent bulbs to LEDs can seem like a daunting task. There are a lot of lights in those old machines! Below, we’re going to walk you through how to do it, step by step. Consider this Kit Building 101. Everything you’ll need to know, but only the basics.
Don’t worry about taking notes, we’ve got a worksheet that you can print out.
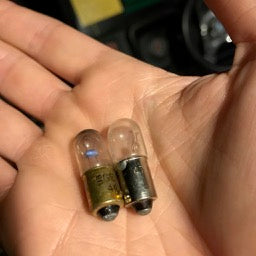
Step 1: Know the difference between wedges and bayonets
Ignoring flashers for the moment (those larger, extremely bright bulbs in modern machines that flash when you do something awesome), your machine has one or two different styles of sockets.
Wedge sockets (which call for a #555 bulb), are found almost exclusively under inserts (the colored windows in your playfield that turn on and off to tell you what to shoot for) on games made in the 90s and beyond. They are likely used in the backboxes of these same games. There are of course a few exceptions (you’ll find games which use bayonets in the backbox, and games with wedges in the GI).

Bayonet sockets (which call for a #44/#47 bulb), are found almost everywhere else. These have a metal base. To remove the bulb, push in and give it a twist.
Next we’ll try to figure out how many of each you will need for your game. Starting with the easiest place to count…
Step 2: Count the small sockets in your backbox
You’ll need to remove the backglass or translite for this step. Modern Stern games use a single fluorescent tube, but all other games will require a ton of bulbs.
Count how many small sockets there are, noting which type of socket they are, bayonet or wedge and write it down on the “Backbox” line on the sheet (under “always on lighting”). I say “small socket”, because your game may have larger sockets. These are for flashers and are often a different color socket.
We’re going to ignore flashers for now, but will come back to them later.
Step 3: Count up the inserts
Inserts are the colored transparent or translucent plastic windows set into the playfield. They come in a variety of colors, and each have a bulb underneath that shines up through them. These are turned on and off to display the status of the game while you play: what to shoot for, how much bonus you have, and more.
With modern games, inserts are most commonly wedge, but there are often a handful of bayonets. Your manual might tell you which is which, but you may also have to lift the playfield and find out for yourself.

The worksheet has lines for six different colors: red, orange, yellow, green, blue, white. This should cover just about every game, but if you run into a different color, add a new line to the sheet. Count up how many of each there and write it down in the right column/row under “Controlled Lighting” on the worksheet.
For inserts, we recommend 1SMD non-ghosting bulbs with a clear lens. Non-ghosting bulbs are a little more expensive, but they prevent subtle flickering that can sometimes occur when these bulbs are supposed to be unlit.
Step 4: Count the Playfield GI
We discussed inserts, now let’s talk about playfield “general illumination”, or GI. These are lights that are always on. They usually reside around the edges of the playfield, under the slingshots, and between rollover lanes. You may even find a few near the middle of the playfield, depending on the layout of the game. These stick up through holes in the playfield, and are then covered with plastics containing the game artwork. The bulbs illuminate the plastic and cast light onto the playfield.

Count up the number of playfield GI bulbs in your machine. Many games have them between the rollover lanes at the top of the playfield - don’t forget these! It maybe be difficult to find how many there are on your machine, as some incandescents have probably burned out. Most games have between 25 and 45 playfield GI bulbs. If your count is less than that, you should probably order a few more than you counted.
We recommend frosted 2SMD bulbs for playfield GI. This is the same bulb used in modern Stern games, although they use clear tops instead of frosted. (Bulbs that are always on will never have issues with ghosting, so there is no need to spend the extra money on non-ghosting bulbs).
We recommend mostly white GI. Sunlight White is the go-to color, but if the game has very warm colors, then go with Warm White. If it has very harsh/cold colors, use Cool White. Some people like to use many different colors in their general illumination, but we find this makes the game too dark and washes out the original artwork.
(When installing playfield GI bulbs, it’s often significantly easier to do so from below the playfield. If you have a good 1/4 inch magnetic nut driver with a long handle, you’ll be able to easily able to unscrew the socket, replace the bulb, and screw it back in. This is much easier than removing layers of ramps and plastics.)
Step 5: Odds n’ Ends
Pop Bumpers: If your pop bumpers turn on and off with the gameplay, then you’ll want to count them in the Controlled Lighting section of the worksheet. Otherwise, they fall under GI. Most people will match the colors to the color of the pop bumper cap.
Start button and buy-in button: these are controlled, so you want to choose non-ghosting bulbs. It can be a tight fit, so we recommend 4SMD non-ghosting.
Coin slots: these are always on. Most people will color match these.
Step 6: Flashers
Flashers are bulbs that come on for a fraction of a second, usually to indicate that you did something awesome. They’re often above the playfield, under a large dome, or underneath the playfield under large inserts. They run on 12v, which is different from all the bulbs above which are 6.3v. LED flashers are bright! Many people decide leave their flashers as incandescent when upgrading their game.
Flashers can be hard to count. There is often a chart in the manual that lists each one and which type of socket it is. Another way to count is by going through the test menu on your machine. Sometimes there are two (or three) sockets for each one, so do pay attention.
Most games use a mix of wedge (#906) and bayonet (#89) flashers. These sockets look just like #555 and #44/47 sockets, but they are bigger. Be sure to note which flashers are wedge and which are bayonet when counting them up on the worksheet.
For these bulbs, we recommend 8SMD flashers.